A Tutorial on Using the National/Diamond Garment Cutter Systems
Would you believe me if I told you that drafting custom patterns for historical clothing could be as easy as playing connect-the-dots? And that hundreds of these patterns are already available for free?
Welcome to the world of pattern drafting manuals of the late 19th century! These books were created as an alternative to paper patterns and promised their users greater flexibility in sizing, since the pieces were drafted individually according to the wearer’s measurements. The system depended upon the use of sets of rulers called “apportioning scales/rulers.”
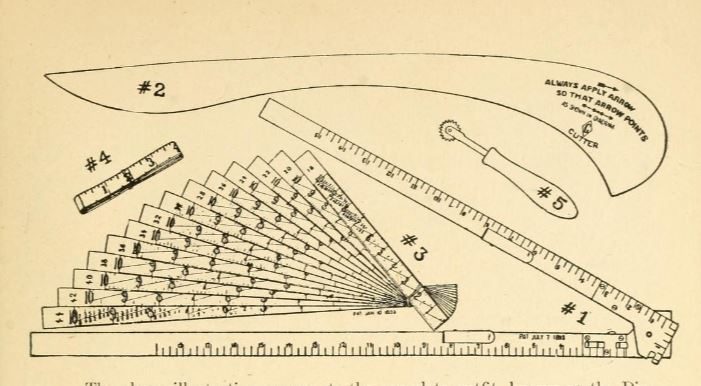
Object #3 in this diagram is what the original apportioning rulers for this system looked like. Instruction Book by the Diamond Garment Cutter Correspondence School, 1903, pg. 3)
An apportioning ruler is a ruler where the numbers are not spaced according to inches or centimeters, but instead are placed further or closer together depending on how much you need to scale a pattern piece up or down from the base pattern to fit either your chest or waist measurement. When you copy the numbers on the diagram over to a new piece of paper using the correct apportioning ruler, the resulting pattern piece will fit whatever measurement you initially selected!
One popular system that uses apportioning rulers was invented in Chicago and I’ve found it to be a game-changer for sewing historically accurate costumes. Initially launched as the National Garment Cutter System in 1884, it was renamed the Diamond Garment Cutter System in the 1890s and also gained an accompanying periodical titled The Voice of Fashion, which offered subscribers more up-to-date patterns. Unlike many of their competitors, these books contained clothing patterns for men, women, and children.
| Year | Book | Link |
| 1884 | The National Garment Cutter by Goldsberry, Doran and Nelson | Scan available on Archive.org |
| 1888 | The National Garment Cutter Book of Diagrams by Goldsberry, Doran, and Nelson | Scan available on Archive.org |
| 1890 | The National Garment Cutter Book of Instructions and Diagrams by Goldsberry, Doran, and Nelson | Instruction book and Diagram Book available at the Abakanowicz Research Center |
| 1892 | Voice of Fashion [Summer] | Available at the Abakanowicz Research Center |
| 1895 | The Diamond Garment Cutter by Goldsberry, Doran, & Nelson | Scan available on Archive.org |
| 1897 | The Diamond Garment Cutter Book of Diagrams by W. H. Goldsberry | Available at the Abakanowicz Research Center (Contains three patterns designed for those with chest measurements between 38 and 45 inches) |
| 1897 | Voice of Fashion [Fall] | Scan available on Archive.org |
| 1897 | Voice of Fashion [Winter] | Scan available on Archive.org |
| 1900 | Voice of Fashion [Spring and Summer] | Available at the Abakanowicz Research Center |
| 1901 | Voice of Fashion [Summer and Fall] | Available at the Abakanowicz Research Center |
| 1903 | Instruction Book by the Diamond Garment Cutter Correspondence School | Available on Archive.org, this book has the clearest directions on using the system and adjusting patterns to fit different body types |
I’ve created several projects using these books and the apportioning rulers from the American Seamstress and have been impressed by how easy it is draft the pattern pieces. The best part is that there’s not a bit of math involved, all you must do is read numbers on a diagram and ruler! Keep reading for an explanation on how it’s done.
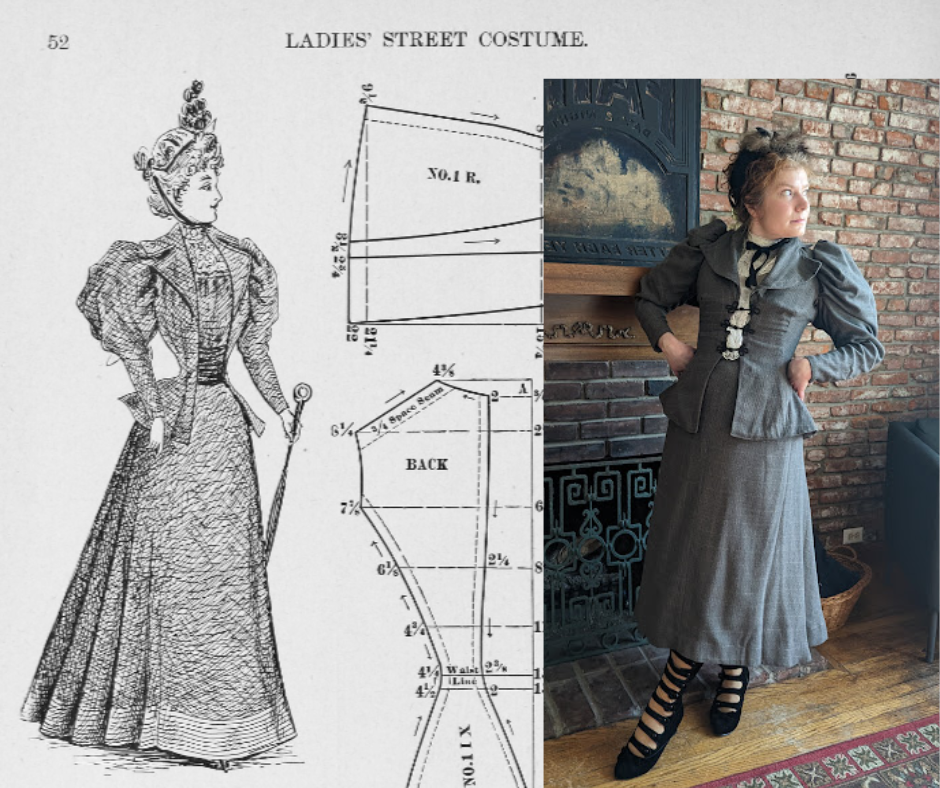
Ladies’ Street Costume (Diamond Garment Cutter Book of Diagrams, 1895, p. 52)
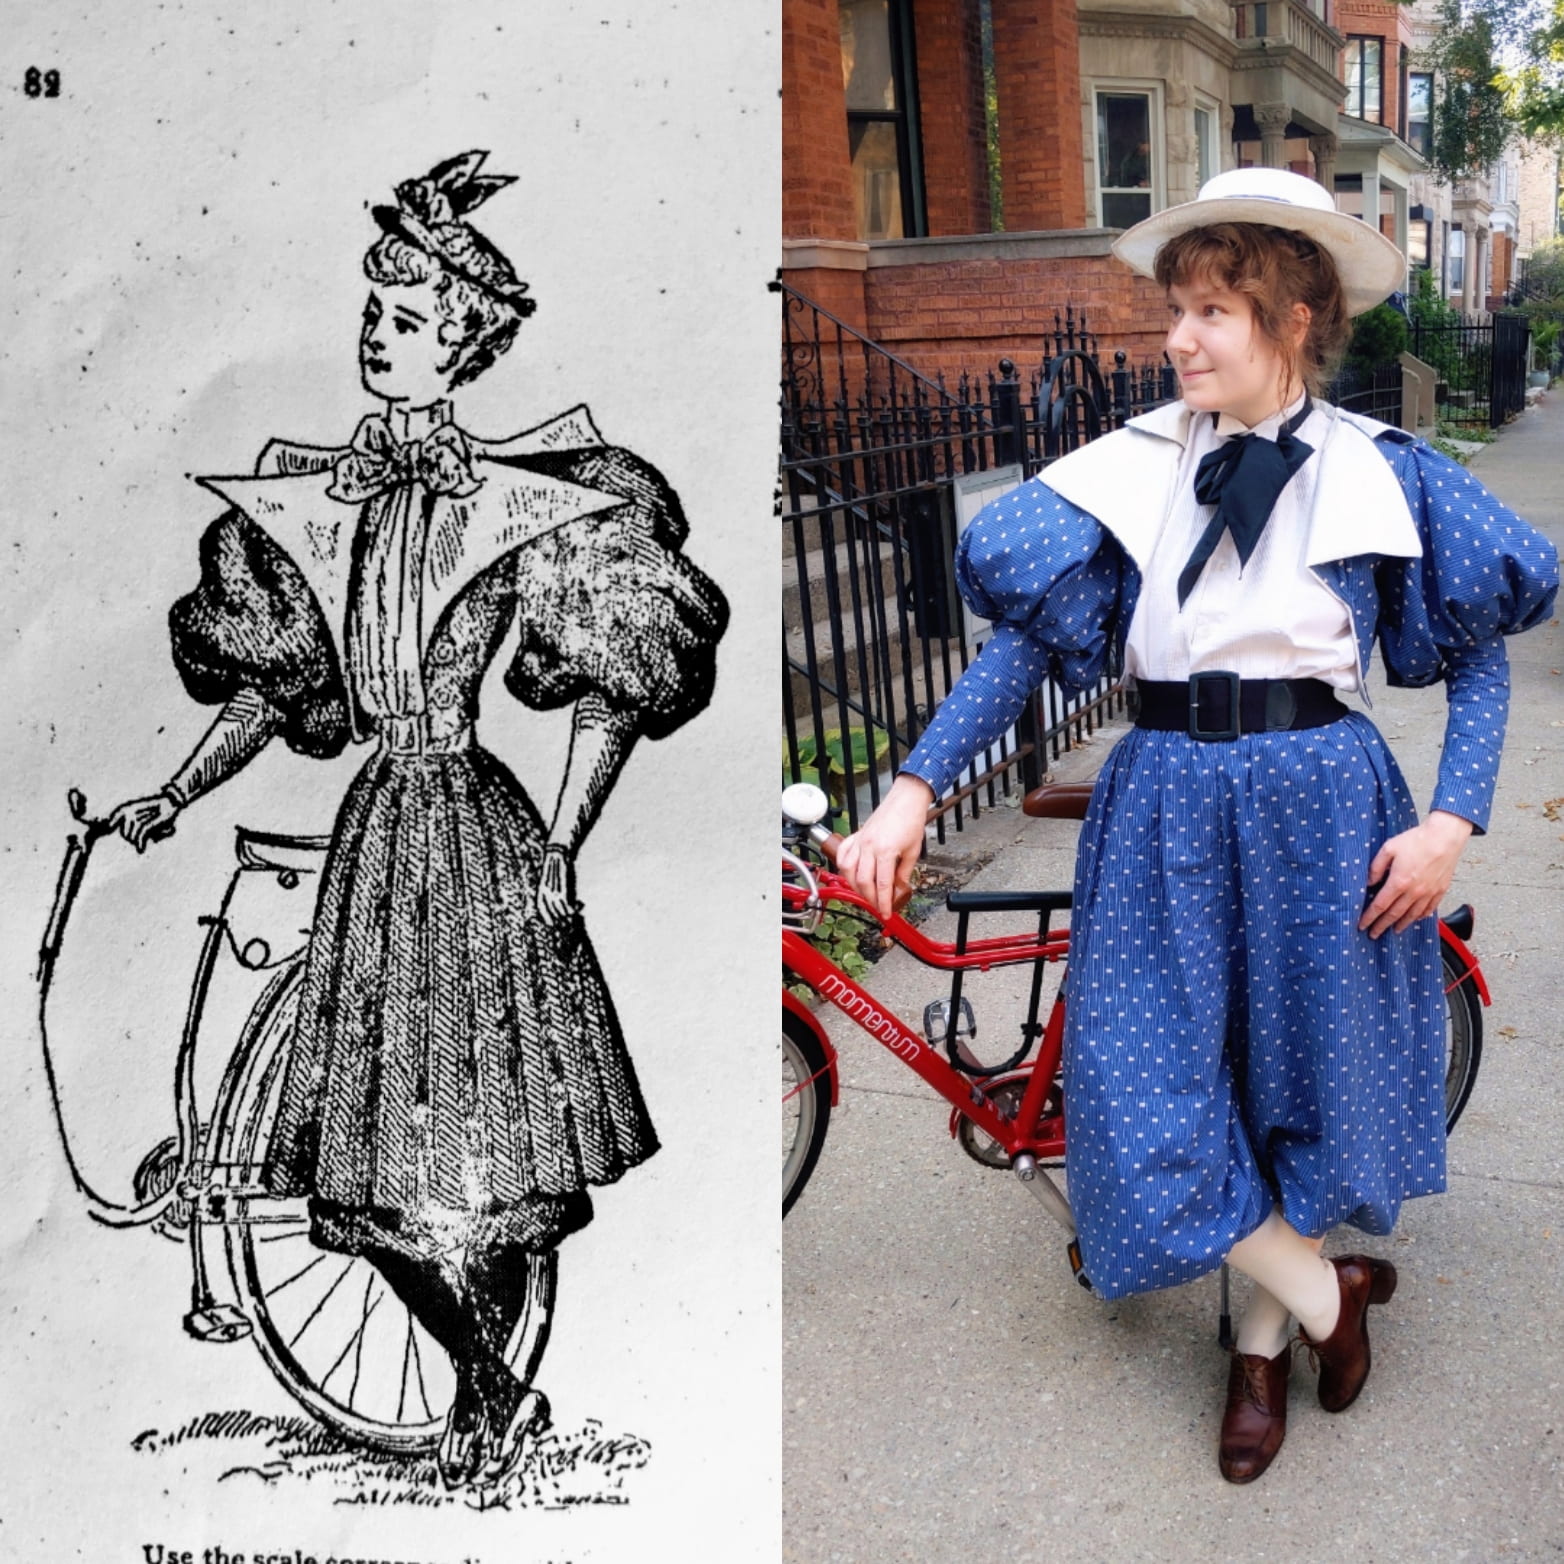
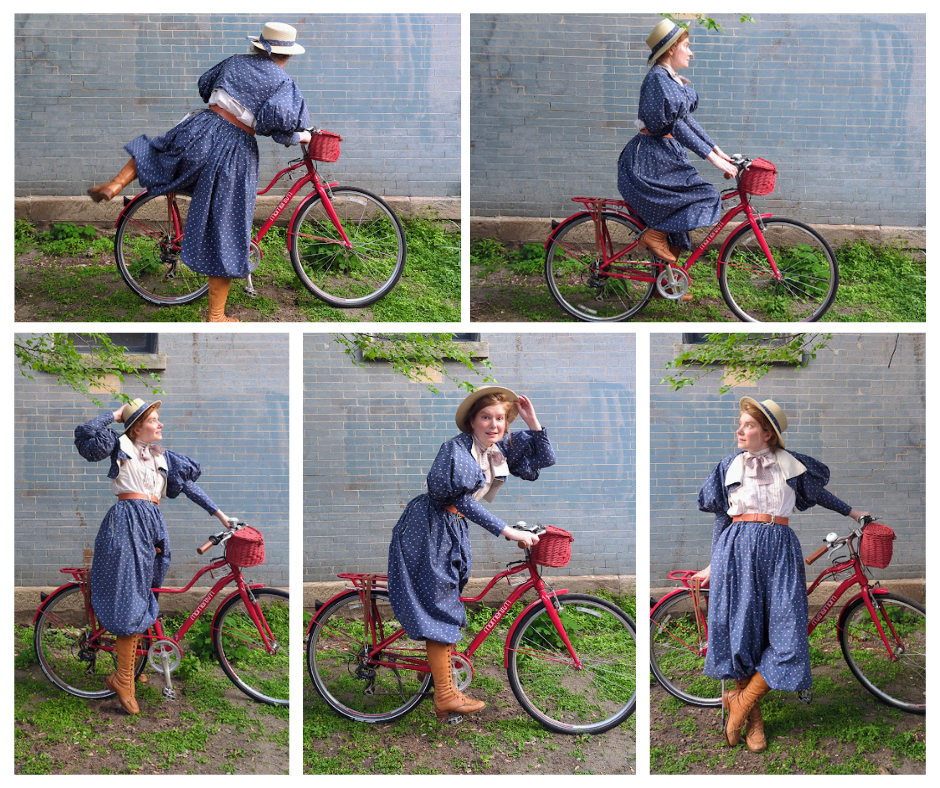
Ladies’ Bicycle Costume with Ferris Wheel Sleeves, (Diamond Garment Cutter, 1897, p. 82)
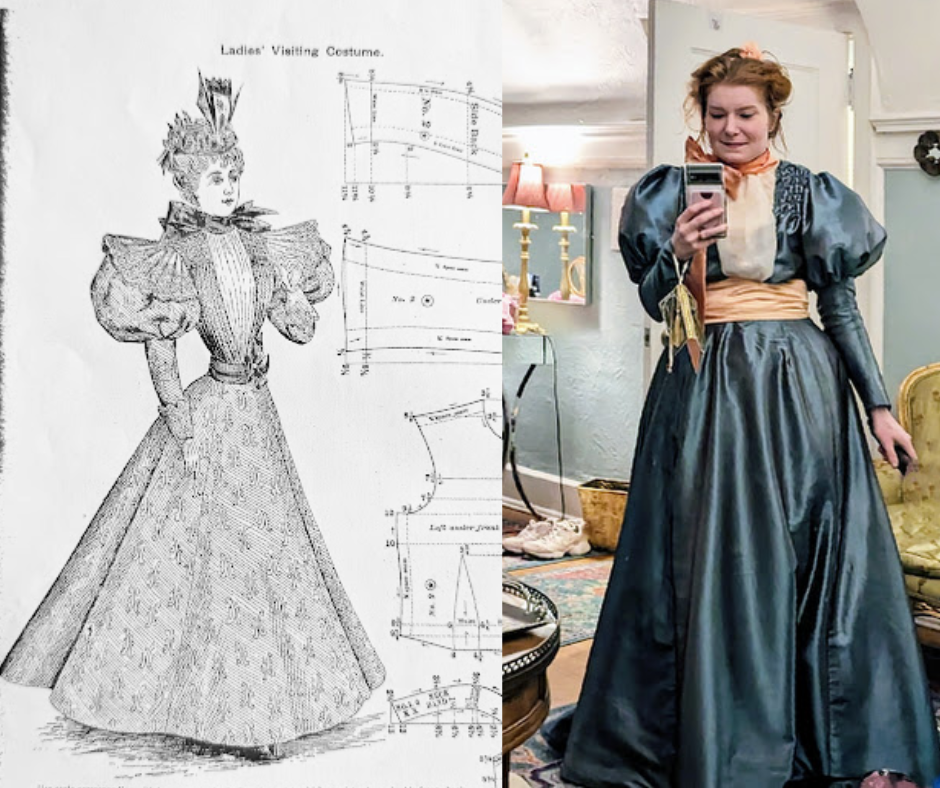
Ladies’ Visiting Costume (Diamond Garment Cutter Book of Diagrams, 1897, p. 17)
Tutorial
To create a pattern from these books that fits you, you will need:
- Gridded paper (wrapping paper with a grid on the back works well)
- Reproductions of the original apportioning rulers from Mrs. Depew
- A French curve
- A ruler
- A marker
- Scissors
Following the instructions on the pattern you select (“use scale corresponding with bust/waist/chest measure”), pick a ruler that matches the specified body measurement. For instance, if your waist measurement is 32, use the ruler that says “32” at the top.
Step 1: Draw a large right angle on your grid paper, then use your selected ruler to make markings at the points corresponding to the numbers on the vertical axis of the diagram, starting where it says “A,” and then moving down (I find it helpful to label each point with the number it matches with in the diagram).
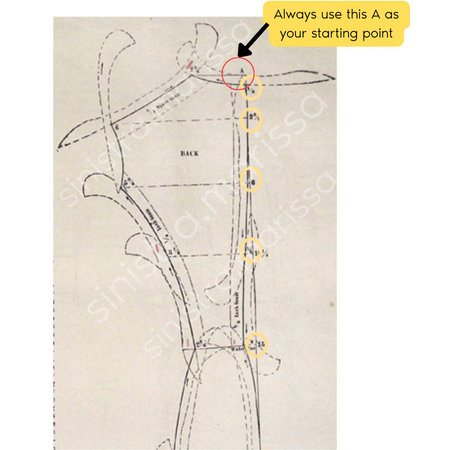
Step 2: Using the markings that you just made on the vertical axis as your starting points, repeat this process of measuring and marking the points on the horizontal axis. You should be left with something that looks like an unfinished connect-the-dots puzzle.

Step 3: Using your French curve and straight edge where necessary, connect the dots of your pattern to match the shape of the original diagram illustration. Your French curve’s largest side always points in the direction specified by the arrows on the original diagram (highlighted in right illustration). This will leave you with a pattern piece properly scaled up to your size, though you may still need to adjust it, so always do a mockup or a tissue fitting first.
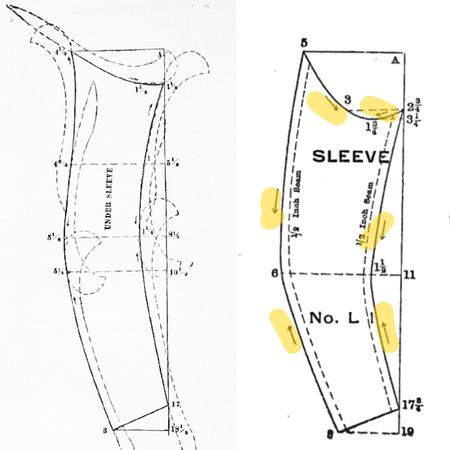
Important: Wherever a pattern piece indicates “cut double” that means cut it out on the fold of the fabric! A seam allowance of roughly ¾ an inch is also included on these patterns, and they’ll note where this is not the case, usually at the shoulder seams.
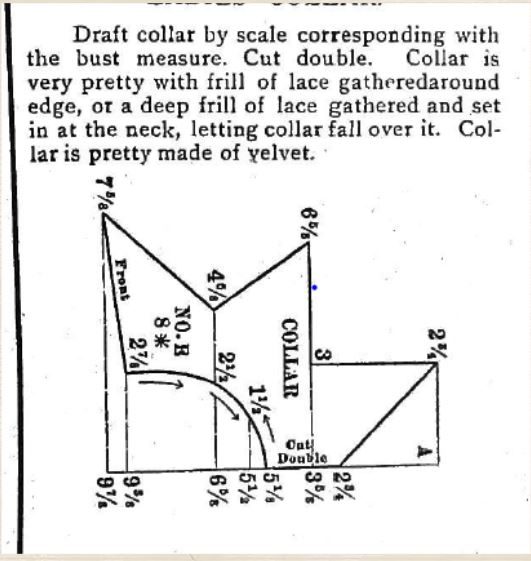
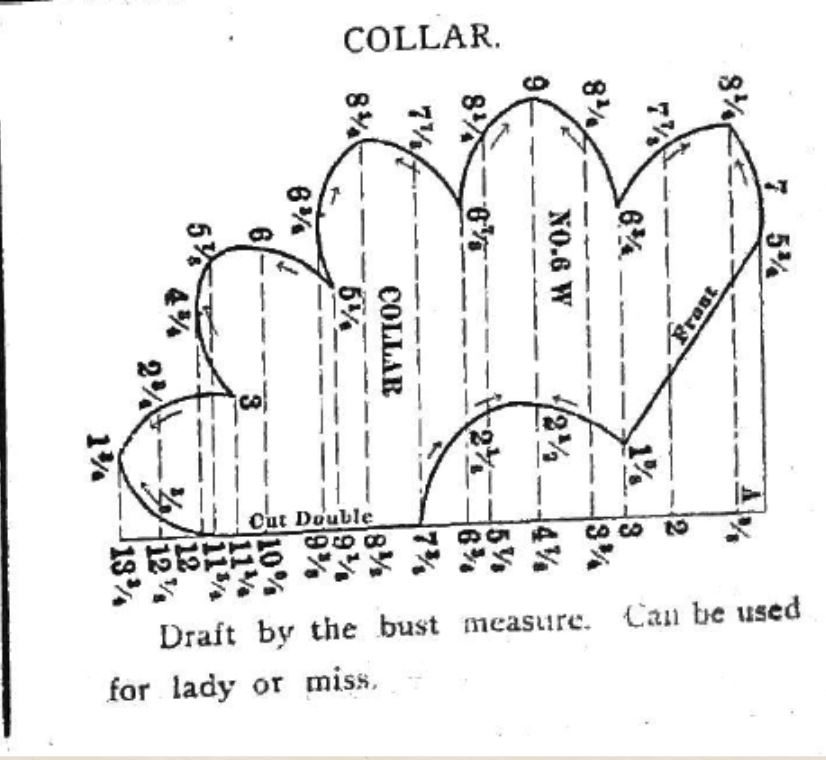
Even if you’re familiar with how clothes are put together, creating a finished garment from these pattern pieces can be quite challenging because there are little to no directions of how the pieces need to be assembled. Studying pictures of extant garments can be helpful and I also recommend starting with something simple like these two detachable collars below, both taken from the 1897 Diamond Garment Cutter Book of Diagrams, page 19. Once you get the hang of it, you’ll have literally hundreds of free, historical patterns at your fingertips! Happy sewing!
Further Reading
- Remaking History: Sewing a Women’s Bicycle Costume from an 1897 Pattern
- PDF of patterns for the three Ladies’ Cycling Costumes
- Research Fashion History at the Abakanowicz Research Center using the Costume Research Files
- CHM Costume and Textiles Image Gallery
- Costume and Fashion Research Library Guide
- Follow my sewing projects on Instagram: @sinistra.marissa